Ecommerce Product Photography: A Fashion Brand Shot List
Build a fashion product-image system that answers buyer questions about fit, fabric, colour, details, and styling before they have to ask.
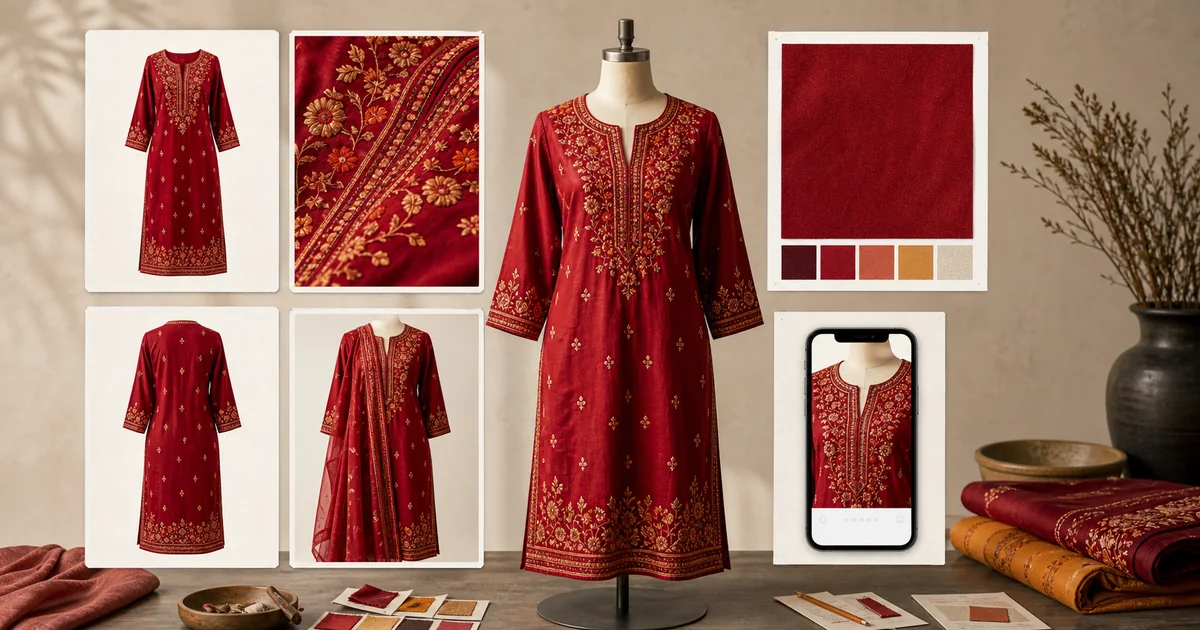
Ecommerce product photography for fashion brands is not a single beautiful hero shot. It is a set of images that answers a shopper’s questions before she has to ask them: What does this look like from the back? How does the fabric fall? Is the red really that red? Where does the hem land? What exactly is embroidered? Build that evidence set first, then adapt it for the product page, marketplace, ad, and social post.
That distinction matters because an apparel buyer cannot inspect the garment in person. A polished campaign image may earn attention, but a product page still has to make the product understandable enough to buy. Shopify makes a similar distinction between clean main images, lifestyle context, and close-ups that reveal product features; Google recommends additional views and close-ups for clothing so shoppers can make a more confident decision. Shopify’s ecommerce photography guide and Google Merchant Center’s apparel guidance are useful baselines.
Start with the buyer question, not the shot style
Before writing a brief or setting up a shoot, list the details that could make a cautious shopper pause. For a kurta, that might be the embroidery, sleeve finish, lining, fabric opacity, silhouette, colour, and whether a dupatta is included. For a denim jacket, it could be the wash, pocket placement, hardware, shoulder shape, and fit through the body.
Each image should earn its place by resolving one of those uncertainties. This is more useful than asking for “ten photos per SKU,” because the right number varies with the garment. A plain oversized T-shirt needs different proof from a heavily worked occasion set.
| Buyer question | Image to create | What it should make clear |
|---|---|---|
| What exactly am I buying? | Clean front view | Silhouette, neckline, sleeve, length, and overall colour |
| How does it fit and move? | On-model or styled fit view | Proportion, drape, and styling scale |
| What is on the back? | Back view | Back neck, closures, print placement, and silhouette |
| Is the material or work worth the price? | Detail crop | Weave, embroidery, buttons, trim, and finishing |
| Will the colour match my expectation? | Consistent close and full view | Colour character under a controlled, repeatable treatment |
| How can I wear it? | Context or complete-look image | Occasion, styling idea, and what is included in the set |
This is not a promise that imagery removes every objection. Sizing, care, material composition, dispatch timing, and returns still need clear product copy. But images and copy should work together instead of each carrying the entire burden.
Build the six-image product evidence set
For a hero apparel SKU, begin with these six roles. They are a planning model, not a rigid requirement: add views when the garment needs more explanation and remove redundant ones when it does not.
1. The clean front view
Use this to establish the product quickly. Keep the garment central, make the silhouette legible, and avoid styling choices that hide the sleeves, hem, neckline, or product boundary. If the image may become a main marketplace or Google listing image, check the current channel rules before publishing. Google asks sellers to make the product the focus and provides specific guidance for apparel images. Its image-link requirements also explain requirements around image quality, framing, and additional images.
2. The fit and drape view
Fashion is not only a flat object. An on-model or styled view can explain where a garment sits on the body, how a fabric falls, and how much volume a silhouette has. Show the whole garment when that information matters; do not crop out the part of the body that makes length or proportion understandable.
For collections with a wide size range, the task is not to pretend one image represents every fit. Use clear size information and choose imagery that helps buyers understand the cut. A visible model size and garment measurements can do more work than vague claims such as “perfect fit.”
3. The back view
Back images are easy to omit and expensive to answer later. They are especially important when a garment has a back opening, tie, print, embroidery placement, unusual seam, or a different hem treatment. If the back is intentionally simple, show it anyway when a shopper would reasonably want to confirm that.
4. The material and construction close-up
Show the details a customer is paying for: zari work, hand-feel cues, weave, stitching, lining edge, buttons, print repeat, or pocket construction. This is not an excuse to overstate quality. Pair the crop with precise material and care information on the product page so the visual detail and written specification agree.
5. The colour check
Colour is a frequent source of hesitation in online fashion. Use a consistent treatment across the catalogue and avoid a creative colour grade that makes the product difficult to recognise from one channel to another. A close crop can help reveal texture, but it should not become the only colour reference; keep a full-garment view available too.
6. The context view
This is where styling, setting, and the buying moment can help. A festive co-ord may need an occasion-led frame; a workwear kurta may need a practical daytime look. Keep the garment recognisable. Context should make the product easier to imagine in a buyer’s life, not turn it into a prop in an unrelated mood board.
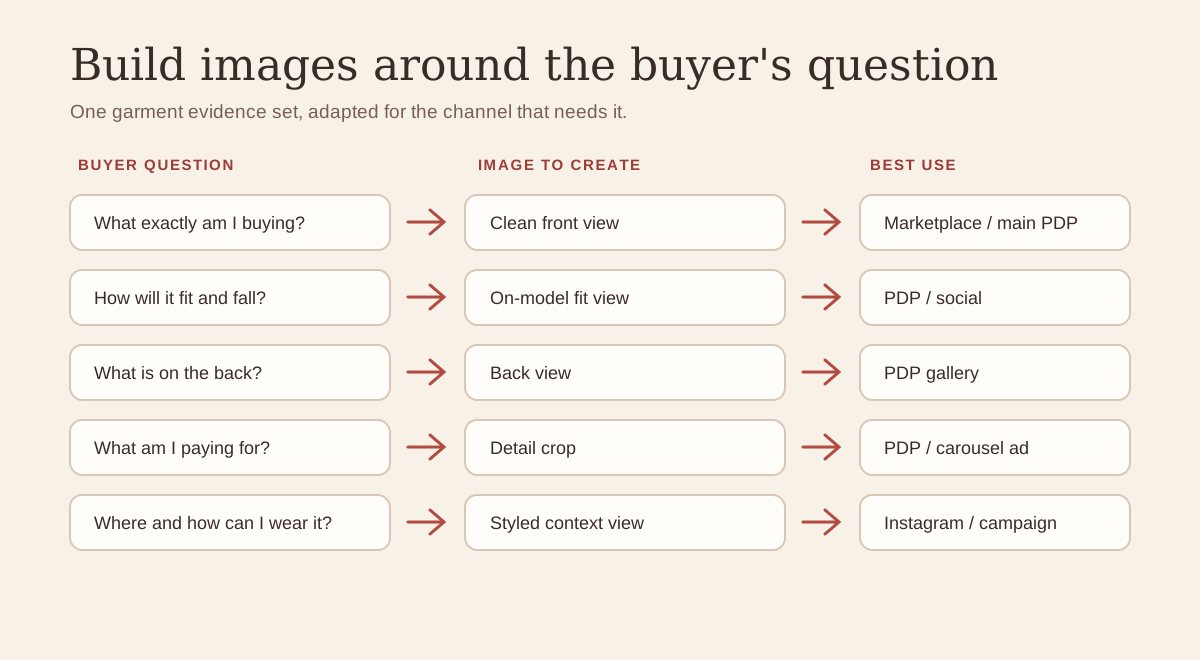
Plan image roles once, then adapt the same garment evidence across every channel.
Adapt the set by channel instead of starting again
The same approved image should not be copied unchanged everywhere. A Shopify product page can carry a fuller sequence. A marketplace thumbnail needs immediate product clarity. A Meta ad needs a fast visual hook but should still lead to a landing page that answers the remaining questions. Instagram may give more room for styling and detail storytelling; WhatsApp may need a simple, legible product card and a quick answer about price, size, and availability.
Think of this as one source-of-truth evidence set with channel-specific crops and ordering. That approach makes brand consistency easier and reduces the chance that a marketplace image, product page, and ad accidentally show conflicting versions of the same garment.
Do not use a lifestyle frame as a substitute for the clean product view. Search and shopping surfaces often need the product to be unambiguous, while the PDP needs the additional evidence that makes a customer comfortable continuing. Google’s guidance specifically distinguishes the main image from additional images and recommends multiple angles and close-ups for apparel. Read the apparel best practices.
Write a shot brief that survives hand-offs
A useful brief prevents the team from having to rediscover the same requirements every time a colourway, restock, festival edit, or new channel appears. For each SKU, record:
- Garment reference images: front, back, and the details that must not drift.
- The intended customer and buying occasion.
- The six image roles that apply, plus any category-specific additions.
- Required visible details: colour, fabric, trim, fit notes, set contents, and exclusions.
- Channel outputs: PDP, marketplace, paid social, Instagram, WhatsApp, or campaign banner.
- Approval checks: garment accuracy, crop, colour consistency, product claims, and final file naming.
The brief is also where you separate catalogue work from campaign work. Catalogue images prove the product. Campaign images create a reason to care now. A single asset can occasionally do both, but asking every frame to do both jobs usually creates a weak compromise.
Avoid the common mistakes
The first mistake is treating every product image as decorative. If a detail crop is beautiful but does not reveal the embroidery, it has missed its job. The second is allowing different shoots or edits to change the apparent colour, cut, or finish of the garment. That makes the visual system less trustworthy precisely when a buyer needs reassurance.
The third is producing channel assets before deciding what needs to be proven. You then get a folder full of crops but no clear front view, no back view, or no detail the customer actually needs. Finally, do not make the shoot the only place product knowledge lives. Preserve the references, brief, approved frames, and buyer questions so the next version can be created without starting from zero.
When a creative system is more useful than another shoot
Once the evidence set is clear, the work becomes repeatable. RoopTantra can help a fashion team turn real front and back garment references into product imagery, revisions, and channel-specific variants through Karigar chat. The important safeguard remains the same: review the output against the garment reference, the product specification, and the channel’s requirements before publishing.
That is the useful next step for a growing catalogue: save the approved brief and buyer-question checklist with the product, then reuse them when a new colourway, campaign, or channel demands more creative. If you are still setting up your first collection, start with our D2C fashion launch guide and build the product evidence set before scaling the campaign.
Frequently asked questions
How many photos does an ecommerce fashion product need?
Start with the smallest set that answers the buyer’s important questions: a clean front, fit context, back, close-up, colour check, and styling or context view are a useful baseline for many apparel products. Add images when a garment has details, set contents, or construction that need further explanation.
Should clothing product photos use a white background or a lifestyle setting?
Use both for different jobs. A clean, product-focused image helps shoppers identify what is being sold, while a lifestyle or styled image adds fit and occasion context. Google Merchant Center’s apparel guidance recommends keeping the product clear in the main image and using additional images to provide further context and detail.
What should a fashion product detail photo show?
Show the specific construction or material feature that affects the buying decision: weave, embroidery, print, trim, button, lining, seam, or texture. Support it with accurate product copy rather than asking the image to make an unsupported quality claim.